Welcome to the ultimate guide for making one of the most popular snacks in the modern fitness world today. These delicious little bites are often called energy bites or power balls because they are packed with nutrition and taste exactly like a treat. This recipe is designed for anyone who wants a healthy snack but does not want to spend hours in the kitchen or turn on a hot oven. You will find that these protein balls are the perfect mix of sweet and salty while providing a great balance of healthy fats and muscle building protein. Because they are so simple to make, they have become a staple in many households where people are busy but still want to eat well. This specific recipe focuses on using whole ingredients that you probably already have in your pantry right now.
The reason why so many people absolutely love this recipe is because it feels like you are eating raw cookie dough without any of the health risks. Most protein snacks you buy at the store are filled with strange chemicals or artificial sweeteners that leave a weird aftertaste in your mouth. When you make these at home, you have total control over what goes into your body and you can adjust the sweetness to your liking. People also love how versatile these bites are because you can swap out ingredients based on your own dietary needs or personal preferences. Whether you like dark chocolate or white chocolate or even dried fruit, this base recipe works for almost everything you can imagine. It is truly a crowd pleaser that appeals to both children who want a sweet treat and athletes who need quick fuel.
You might be wondering when is the best time to whip up a batch of these tasty protein balls for yourself or your family. They are perfect for those crazy Monday mornings when you do not have time for a full breakfast but need something to keep you full until lunch. Many people also find that these are the best pre workout snacks because they give you a quick burst of energy from the natural sugars and healthy fats. If you often find yourself reaching for candy or junk food during the afternoon slump at work, these will be your new best friend. They also make a wonderful healthy dessert for kids after school or a nice treat to bring to a fitness group or a hiking trip with friends. Making them feels like a small act of self care because you are preparing something that nourishes your soul and your muscles at the same time.
In terms of fitness and health, these protein balls are a game changer for anyone trying to hit their daily protein goals without drinking shakes all day long. We all know that protein is essential for repairing tissues and keeping our metabolism running smoothly throughout the day. However, it can be hard to find snacks that are high in protein but low in processed flour and white sugar. This recipe uses oats and nut butter to provide fiber and healthy oils which help you feel satisfied for a much longer period. When you take that first bite, you will experience a soft texture followed by the crunch of chocolate chips or nuts. It is a sensory experience that proves healthy eating does not have to be boring or tasteless at all. Let us dive into the simple details so you can start rolling your own batch of goodness right away.
Ingredients You Will Need
-
2 cups of Old Fashioned Rolled Oats
-
1 cup of Natural Creamy Peanut Butter
-
Half cup of Honey or Pure Maple Syrup
-
Half cup of Chocolate Chips or Cacao Nibs
-
Quarter cup of Ground Flaxseeds
-
Quarter cup of Chia Seeds
-
1 teaspoon of Pure Vanilla Extract
-
1 scoop of Vanilla or Chocolate Protein Powder
-
1 pinch of Sea Salt
Step by Step Method
To start this process, you need to find a large mixing bowl that gives you plenty of room to stir everything together. First, pour your two cups of rolled oats into the bowl and make sure there are no large clumps of grain. Add in your ground flaxseeds and chia seeds which will provide a nice boost of fiber and omega three fatty acids. Now, take your protein powder and sprinkle it over the dry ingredients while stirring with a wooden spoon. This helps ensure that the protein powder is evenly distributed so you do not get a chalky bite later on. Add that small pinch of sea salt now because it helps to bring out the natural sweetness of the honey and the chocolate.
Once your dry ingredients are well mixed, it is time to add the wet ingredients which act as the glue for the recipe. Pour in your one cup of creamy peanut butter and make sure it is at room temperature so it flows easily. If your peanut butter is too thick or has been in the fridge, you can microwave it for ten seconds to make it softer. Next, drizzle your half cup of honey or maple syrup over the top along with the vanilla extract. Use a sturdy spoon or even your clean hands to mix everything together until a thick dough forms. If the mixture feels a bit too dry or crumbly, you can add one extra tablespoon of peanut butter to help it stick.
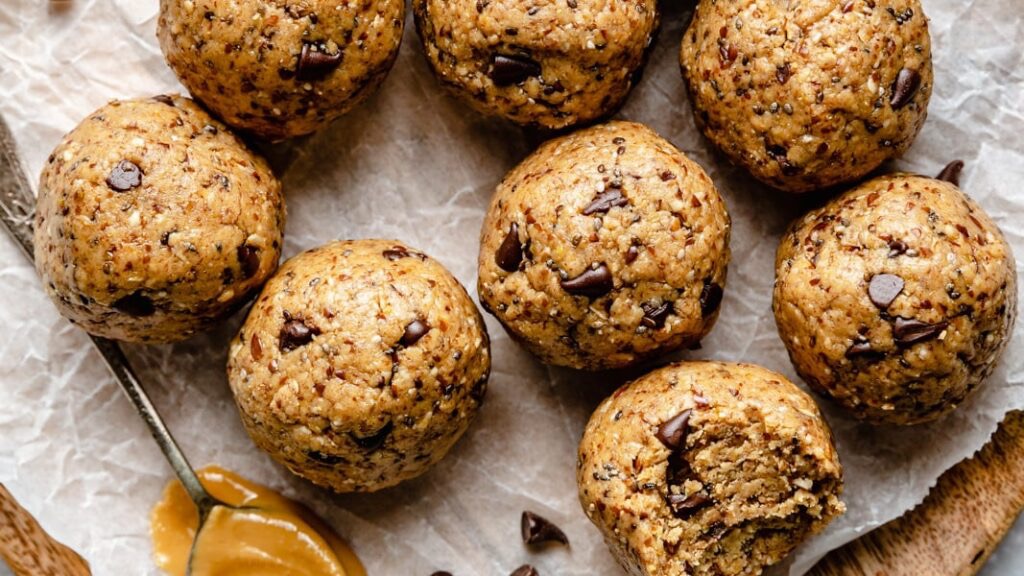
Now comes the fun part where you add the texture and extra flavor to your snack. Fold in your half cup of chocolate chips or cacao nibs using a gentle stirring motion so they are spread throughout the dough. Once the mixture is fully combined, place the entire bowl into the refrigerator for about thirty minutes. This chilling step is very important because it allows the oats to soak up some of the moisture and makes the dough much easier to roll. If you try to roll them immediately, they might stick to your palms and create a big mess. Waiting just half an hour makes a huge difference in the final shape of your protein balls.
After the dough has chilled, take it out of the fridge and prepare a baking sheet lined with parchment paper. Use a small cookie scoop or a regular tablespoon to scoop out a portion of the dough about the size of a golf ball. Place the portion between your palms and roll it gently until it forms a perfect round sphere. Set each finished ball onto the parchment paper and repeat the process until all the dough is gone. You should end up with about twenty to twenty four balls depending on how large you make them. Once they are all rolled, you can eat one right away or put them back in the fridge to firm up even more for long term storage.
Why This Recipe Is Special
This recipe stands out because it requires absolutely no cooking or baking skills to achieve a professional result. Many people feel intimidated by healthy recipes that require expensive kitchen gadgets or complicated techniques. Here, you only need a bowl and a spoon which makes it accessible for students, busy parents, and beginners. The combination of ingredients is carefully chosen to provide a slow release of energy rather than a quick sugar spike and crash.
Furthermore, the use of flaxseeds and chia seeds adds a layer of nutrition that many standard snacks lack. These seeds are tiny powerhouses of minerals that support heart health and digestion. Because these balls are homemade, they contain no preservatives or artificial colors which is much better for your long term wellness. The taste is also superior to store bought bars because the ingredients are fresh and the flavors are vibrant. It is a budget friendly way to keep high quality snacks in your house without spending a fortune at health food stores.
Extra Tips for Better Taste
If you want to take these to the next level, try toasting your oats in a dry pan for five minutes before mixing them in. This gives the protein balls a nutty and toasted flavor that is very delicious. You can also experiment with different types of nut butters like almond butter or cashew butter if you have an allergy to peanuts. For those who love a bit of crunch, try adding crushed pretzels or chopped walnuts into the mix.
Another great tip is to roll the finished balls in shredded coconut or cocoa powder for a beautiful finished look. This makes them look like fancy truffles and adds an extra layer of flavor on the outside. If you find that you want a more dessert like experience, you can melt a little bit of dark chocolate and drizzle it over the top of the balls after they are rolled. Always store these in an airtight container in the fridge to keep them fresh for up to two weeks. You can even freeze them for up to three months if you like to prep your snacks far in advance.
Final Thoughts
Making your own snacks is a wonderful way to take control of your health and enjoy the process of creating something with your own hands. These no bake protein balls are a testament to the fact that simple food is often the best food. They are sweet, satisfying, and full of the nutrients your body needs to thrive during a busy day. I hope you enjoy making these as much as I do and that they become a favorite part of your weekly routine. Remember that cooking is an experiment, so feel free to make this recipe your own by adding the things you love most.
Nutrition Details
| Nutrient | Amount Per Serving |
| Calories | 120 |
| Total Fat | 7g |
| Saturated Fat | 1.5g |
| Sodium | 45mg |
| Total Carbohydrates | 12g |
| Dietary Fiber | 3g |
| Sugars | 6g |
| Protein | 5g |
This table is based on a yield of 24 servings per batch using the ingredients listed above.
Disclaimer
Please keep in mind that everyone has a unique body with different nutritional requirements and health goals. The information provided in this article is for educational and inspirational purposes only. While these protein balls are made with healthy ingredients, it is always a good idea to talk to a doctor or a nutritionist if you have specific dietary concerns. Results regarding energy levels or fitness may change from person to person based on your overall lifestyle and activity levels.